Those who know me well might accuse me of preaching popular memorization tool Anki as a revolution in studying, and they wouldn’t be that far off. Over the past year I have extensively integrated this software in my studies, with (to me personally) remarkable results in both productivity and academic grades. There are, however, some pitfalls for the casual user to take heed of, and getting the full benefit of your time requires cultivating a proper mindset. Considering the amounts of time I mention Anki abundantly on this site, I decided to write my own short guide on setting up and using Anki efficiently, as well as describe how I’ve personally integrated Anki in my studies.
Anyone with an interest in studying Japanese will surely have heard of Anki. It’s covered extensively on all major learning resources on-line, and the canonical self learner’s beginner path seems to be that of Heisig’s Kanji method, Tae Kim’s online Grammar Guide, and Core 2K/6K/10K,2 all three heavily relying on Anki. Language acquisition certainly remains Anki’s most popular usage, although the software has become broad enough to find it’s way in various other branches (it’s become an integrated routine for medical students, for example, as well as math students thanks to LaTeX support). While it sounds like I’m being paid to advertise Anki, the application remains free and open source (and if you don’t like synchronizing your Anki progress over Anki’s servers you could even set that up on your own as well).3
What is Anki? Why is Anki?! How is Anki?!?
To recap: Anki is an extremely customizable application designed for memorization, available for free on nearly all the major devices4 as well as being accessible online. Being able to study on the road (I commute by train, taking me up to three hours of total traveling time every day) and synchronizing your progress at home is a major boon on using your time practically.
There are plenty of studies on methods for efficient learning, and not surprisingly, classic late-night cramming, along passive studying methods as extensive marking and rereading of texts don’t score very high. On the other hand, active recall testing (questioning yourself by actively trying to come up with the answer to a question) and spaced learning (spreading information absorption over long periods of time) are considered key instruments.5 Anki is an application that achieves both through timed flashcards. The concept is simple: the front of the card displays a question and the backside displays the answer. After showing the answer, you decide whether, and to what extent, you’ve passed. A highly optimized algorithm uses said information to determine the card’s next appearance.
The Guide
Setting up!
Download & Install

Download the application for whatever system you’d like on Anki’s homepage and follow the installer’s steps. I highly recommend investing into a lower-end smart-phone if you don’t own one already and installing a mobile variant of Anki as well. Might be somewhat of a steep investment, but I believe it’s definitely worth the cost in the long run (not just for Anki but plenty of other learning tools such as dictionaries or OCR tools).6 Anki’s layout, especially the desktop application, is pretty bare-bones (although functional and self-explanatory enough to get used to in a couple of minutes).
Account & Syncing
To synchronize your progress over different devices you’ll have to register an account on Anki’s web service (I definitely encourage doing this regardless: just imagine the horror if your device breaks down after 3 years of having intensively studied thousands upon thousands of flashcards).

On your desktop Anki, open Settings → Preferences from the menu, then select the Network tab and insert your user credentials. From the Anki’s main menu, select the syncing icon.
Now do the same on your mobile device. On Ankidroid this is Settings → AnkiDroid → AnkiWeb Account. Make sure the “Download Media” check-box below “Synchronize” is marked !
Now try syncing from this device as well. If everything goes well, we’ll start with our first set right away.

Creating your first set and cards!
It’s best to consider Anki’s main interface as a container for your decks (also called sets) of flashcards. Aside from a filler deck called Default, there’s no content as to speak of yet on a fresh install. Feel free to remove that one (set-specific options such as deletion are accessible through the icon on the right of each set). There’s a lot of pre-made content on the internet, but in order to get used to the interface and learn some of the base features, we’ll create a small set, set up a template for our notes, and create some cards all by ourselves. Don’t worry if the terminology doesn’t make sense yet, we’ll cover that over this guide.
To demonstrate, we’ll create a set containing some important dates, events and notables in Japanese history. Click the Create Set button in the bottom bar, and feel free to name it something along Japanese History 101. We’ll create two more sets, 0 - Important dates and 1 - Meiji. Click and drag these right below the original Japanese History set to make ‘sub-decks’ (child-nodes) out of them, as shown below. Anki orders sets alphabetically, so I often use numbers to realize my intended structure.

Now click on “1 - Meiji” to enter that set. As there’s no content yet you’ll get an appropriate congratulatory message. Doesn’t matter, we’re on a different mission now, on a mission to create. Click on Add to start on your first card. This is how it will look like in the end.

While it might sound somewhat contradictory, I should mention you’ll never actually create ‘cards’ (at least, in Anki-jargon) directly. Instead, what you’re actually making now is a ‘note’, a kind of blueprint containing all information relevant to a certain topic. This is useful because you’ll often want different cards questioning you on the same subject. A so-called ‘note’ on a particular foreign word might contain said foreign word, its translation, an audio reading and an example sentence. Based on this note, you’d be able to generate several cards questioning based on the foreign word, on the translation, or on the audio.
This requires more jargon. Following my explanation, ‘notes’ are blueprints for creating cards and so-called note-types are blueprints for ‘notes’. If we want ‘notes’ with data on a foreign word, as well as its translation, an audio reading and an example sentence, we’ll need a note-blueprint (note-type) with four fields: ‘term’, ‘translation’, ‘audio’ and ‘example sentence’. Based on this note-type, we’ll be able to create notes on foreign vocabulary to our heart’s extent.
Generation and styling of the actual ‘cards’ will also be set up in said ‘note-type’. Following through our language example, we might want to generate three cards: one questioning you on visual recognition (a certain term), one on oral recognition (audio), and one on production (translation), with all three displaying an example sentence along your answer. I made a brief, crude diagram trying to visualize the result of this tutorial.

We’re almost done. Earlier, we made a ‘set’. A ‘set’ (or it’s child-set) contains ‘notes’. As mentioned above, those ‘notes’ belong to a certain note-type and include settings like the amount of fields it contains. In a ‘note-type’, you’ll also specify ‘card-types’. ‘Card-types’ serve as blueprint for the actual ‘cards’ you’ll study: they determine the lay-out side of things: which fields are shown and how are they made up. To summarize in this article’s most confusing sentence to date: when create a new ‘note’, it will generate ‘cards’ based on the ‘card-types’ contained in your note’s ‘note-type’. If this doesn’t make sense yet, don’t worry, you’ll get it soon enough by doing this tutorial.

Type:Basic means we’ll create, unsurprisingly, a note of the basic type. These notes have only two fields (a ‘front’ and ‘back’), and only one generated card: one that shows you the ‘front’ as query, and the ‘back’ as response. We’ll create a new note-type in a second, but for our first note this is fine: a card on Ito Hirobumi, an important figure in the modernization of Japan during the 19th century, using the brief summary below. Inserting images is through copy-pasting. As example, copy Ito’s portrait on the right and paste it in your Create Note screen.
Who
Lower-rank Samurai in Choshu - politician - 4x PM - Resident-General of (protectorate) Korea - founding father of Modern Japan - assassinated by a Korean nationalist.
When
1841 - 1909
Where
Born in Choshu, studied in Universy College London (1863) together with Choshu Five. Spent 18 months in Europa studying different constitutions.
What
Originally a sonno joi movement member before foreign studies. On return, warned Japan against Shimonoseki passage war. Set up a cabinet and tax system, became prime minister and set up Meiji Constitution. Also important for the removal of several Unequal Treaties.

It’s a good practice to properly ‘tag’ your cards as well. You can add multiple tags, separating them with spaces. This allows for quick sorting in Anki’s card browser. You’ll end up with something like the screen-shot to the right. Finish up by clicking add. Congrats, keep this up and you’ll be breezing through your exams in no time!
Creating your own cards… Efficiently!
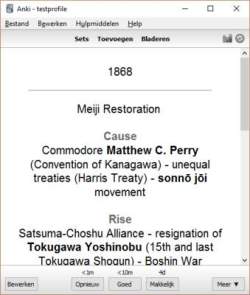
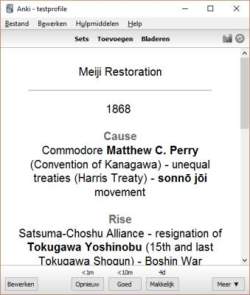
Our first ‘efficient’ card will be one on what is considered a tipping point in recent Japanese history: the Meiji Restoration in 1868. First we’ll create a new ‘note-type’ to generate two ‘cards’, and next, alter the basic template of the ‘card-type’ belonging to the ‘note-type’ to allow pop-up furigana on touch. This one’s meant to get a feeling on Anki’s diverse extension options. You’ll end up with these cards:
First, switch sets to the ‘0 - Important dates‘ subset. If you’re still on the previous add-screen, switch sets by clicking on the corresponding set button near the top right.
There are various ways of creating a new ‘note-type’. For now, just click on the basic type, then manage on your next dialog screen, and add on the one thereafter. Select the first option, and name it something like DateEventDetail. Return and select this new type as your active ‘note-type’.

Next up, you’ll be editing the this note-type to contain three fields. You’ll want a ‘note’ that:
- contains the event’s specific date (
1868), - the event’s name (
Meiji Restoration) - a field for more detailed information.
Thus in the field screen, add a new field called Detail, and rename the other two to Date and Event.

Let’s close this screen and add same data to our fields. For the Detail field, copy-paste the following text. Copy-pasting doesn’t include our preferred layout yet; we’ll do this manually using the tool-bar demonstrated in the screen-shot below (or using classic shortcuts as ctrl-b used in other text-editors). Date and Event will respectively contain 1868 and Meiji Restoration. When finished, don’t click on add just yet!

Cause
Commodore Matthew C. Perry (Convention of Kanagawa) - unequal treaties (Harris Treaty) - sonno joi movement
Rise
Satsuma-Choshu Alliance - resignation of Tokugawa Yoshinobu (15th and last Tokugawa Shogun) - Boshin War
Key points
- Restoration of imperial rule: return of the Emperor’s practical abilities
- The end of Sakoku policy, as well as the Bushi dominated Bakufu, and 265 years of rule by Tokugawa Shogunate
- Five Charter Oath promulgated at Emperor Meiji’s enthronement.
- “one reign, one era name” (
一世一元 ) system adopted: the start of eras named after their emperor.Effect
Meiji constititution (Ito Hirobumi, 1890) - abolition of the han system (
廃藩置県 ) - abolition of the four class system (士農工商 ) - land and tax reforms - nationwide subscription - satsuma rebellion - Rapid industrialization -富国強兵 and militarization
Finally, we’ll change the ‘cards’ generated out of this ‘note’. Click on the Cards button and take a look around. Terms in double brackets (eg. {{Detail}} or {{Date}}) are variables and represent either your note’s fields or its front/backside (eg. {{FrontSide}}). Through tags as <br> and <hr>, you might notice cards use HTML (a markup language used in web-development), and the style-screen in the middle of the window defines your card’s style using CSS (a language standard for web design): colors, font-types, etc. Note that although it could help, you really don’t need any experience in these to make useful cards.

Start by editing your current card. Name it date by clicking more → rename.
Next you’ll want to add the contents of your detail field to your backside’s template. <br><br> creates two line breaks in HTML, adding sufficient room between the content of the two fields.
1 2 3 4 5 6 7 | |
This card will question you on the date: What happened in 1868? That’s right, the Meiji Period. Have some extra information!
Now click on the + button in the upper-right corner to add a new card to generate. Name it Event. This time you’ll edit the templates of the front and back by switching the {{Event}} and {{Date}} variables around; this will question you what happened on the event’s date. Meiji Period? Oh yeah, 1868.

When finished, you should now have something similar to the screen-shot on the left. Useful, right? That’s just the start of how extensible this tool really is!
If you’re still with me, I’d like to introduce you one last useful feature (for now). This one might be less relevant for those not studying Japanese, but honestly, it’s a neat one to keep in mind when designing your cards (I occasionally use it outside language-learning as well). Remember those Japanese characters up there? They had furigana7 on top. We’d probably want this in our cards as well. Luck goes it setting this up is extremely simple and support comes out-of-the-box: just add furigana: (all lower-caps) in front of your field variables in the card-note template screen you’re in, eg. {{Detail}} becomes {{furigana:Detail}} (you won’t see any visible changes yet as we haven’t added the actual furigana in our text itself yet).
Actually, to accommodate Japanese learners, we’ll take away the crutches of kana-reading aids and let it display only on click/touch. Add the CSS below to the bottom of your note’s style (the one in the middle). This hides all furigana (or rather, ruby annotations) by default and displays them upon touch or hover.
1 2 | |
Now, add the actual furigana (contained in square brackets) next to their respective words: eg. 一世一元[いっせいいちげん], 廃藩置県[はいはんちけん], 士農工商[しのうこうしょう], and 富国強兵[ふこくきょうへい]. When done, let’s wrap things up by clicking add.
Now you’ve created your first set(s) and a couple of cards, I highly recommend changing the studying settings tied to your sets as well. Out of the box, Anki will add 20 new cards and allow only 100 repetitions a day. This is highly inefficient. We’ll want to remove the top barrier and be in control of the amount of new cards we study.

Open your main deck’s settings by clicking the icon to the right and selecting settings. Don’t worry, these settings pertain all sets fixed to this “option group”, so you won’t have to do this manually for all your new sets. Edit these three elements:
- New Cards: new cards/day ->
0 - Repetitions: maximum reps/day ->
9999 - Mistakes: action on difficult cards ->
tag only
Instead of an arbitrary number of new cards every single day, you’ll be in control yourself by clicking “customized study” from the set’s menu, and choosing the amount of new cards you’d like to study.
I’ve exported my own copy of this example and uploaded if you want to compare or save yourself the work doing it manually:
- Download: Example set Japanese History
Your first set… Efficiently!
If you’re starting on a new language, you’ll probably want to start by learning basic vocabulary common in every language (eg. words such as “person”, “name”, etc). If that’s the case, there’s no need to reinvent the wheel: look for pre-made decks and if you will, adjust the card lay-out to your own liking. Anki’s own shared deck repository is a good place to start.
If there are no pre-made decks to your liking, but you have access to large data files such as large word lists, another solution would be to import CSV8 files or other forms of text separated by tabs or semicolons and mapping the contents to your note’s fields. An added benefit of this approach is it’s suitability for group (or class) work, by setting up a googledoc sheet, and through a joint-effort creating a large spreadsheet everyone could export as CSV. If there’s demand, I could hack up a small (we’ll see) guide on setting this up.
Personally, I’ve set up my environment to import any new Japanese word I encounter on-line and would like to study straight into Anki with audio and dictionary definitions. As this goes beyond the scope of this article, I’ve written another tutorial on that, and definitely recommend that approach for Japanese learners.
Structuring Data
- “But Stevie”, I hear you ask, “how do I study less structured information with Anki?“
Good question. This involves some thinking on your part: what is it that you’d like to reproduce? What information would you like to memorize? If you’re a student, think creatively on your course and how you could structure its contents in bite-sized pieces to feed your Ankiset.9 Courses are designed with a certain logic in mind, after all. You could start off by making subsets on each of the big chapters of your textbook, or create the answer to potential questions first, mark the important data next, and Ankify10 this. This process is an important step in grasping the big picture and part of the actual studying. This is the exact reason why I’m reluctant to share some of my own sets that don’t involve the need for just rote memorization.
Over the past two years at university I’ve devised and adjusted my own method to structure and create Anki-sets. Feel free to try it yourself (your mileage might vary). It goes somewhat as follows:
- Structure: create a structure based on the course’s structure (this could be as simple as copying the Table of Contents) or on repeating elements (certain theories, models, periods in time, artists, their works, etc). If the content of a single class is relatively self-containing, this is even easier. Use this as template for your set.
- Analyze: analyze all your available sources: your textbook, own notes, power-point presentations, etc. Find repeating elements, highlighted or marked parts, and everything that strikes as important. There’s a reason for that and those should be given priority on memorization.
- Divide: try to divide and rephrase that information into questions suitable for flashcards. Use the Five Ws11 as guideline if stuck (What, Who, When, Where, Why). Try to remain brief in the backside of the flashcard: I often break this rule myself, but, if you have to scroll down through your card it’s usually too long.
- Style: Different information requires different styling. Alter your templates and note types to reflect these by using graphical elements, cloze-encounter, audio, different directions, etc. A simple example. To memorize important dates, I use a card with three fields (Year, Event, Information) and generate two notes on these: one displaying the year in front, one displaying the event. Both show further details on the back.
- Study: You’ve analyzed and processed the contents in a self-containing Anki-set and thus done half the studying already. Congratulations. Now get started on those new cards and drill that knowledge.
If I studied something marketing-oriented I’d probably call this the SADSS-model and write an e-book called “5 Steps To Master All Knowledge (and make you a more successful person in life)”, free of charge if you subscribe to my non-existent newsletters. If I were a social media marketeer I’d add “Number 5 will shock you!” as subtitle. (Don’t worry. I won’t do either.)
Spaced Learning
- “Stevie! If I’m a college student studying one, or several, language(s) alongside other theoretical classes (and I most likely am since I’m reading this blog), won’t this mean I get to repeat hundreds to thousands of cards every single day?!“
Yes. Yes it does mean that.
Think of it this way. You’ll have to study either way. Language acquisition comes with it’s sacrifices: you can’t just stop studying for a few weeks and expect to come out unharmed. Building up an internal dictionary containing tens of thousands of words you recognize on sight or produce actively, utilizing grammatical structures on the spot (often under severe pressure), or comprehending speech at real-time; all of these require an effort not just to memorize, but to maintain as well. Same goes for any other class, you can’t cram your way through university. What this method offers is a way of structuring your data and studying efficiently: paradoxically by studying more you’ll actually save time, as there’s no need to repeat what you already know. If you’re utilizing Spaced Repetition12, the data you need to know will be served (roughly) the moment you’re about to forget it.
- “Even if I’m on a holiday? This makes me very sad! :( I’ll just pretend this method of studying is not suitable for me and dismiss anki forever!“
Sadly, this does mean maintaining your cards even when you’d prefer spending your day in a different way. There’s no pause button to put your cards on hold, so if you fail to go through them several days in row, you’ll have piled up all those lost days and take forever to get through them again.
Of course, once the set has finished it’s purpose (usually after preparing for an exam), you could just as well delete it. It does feel as a waste (after all, what’s the point of studying in the first place?), but sadly it’s just unsustainable to maintain everything, all of this deep knowledge, till the end of times. Another approach here would be to suspend the more trivial cards and just stick on the broad outlines. The choice lies in your own hands!™ I spent about a month on a road trip in the USA this summer; unforgettable memories aside I did maintain my Ankisets the whole time. But as I removed all of my non-Japanese sets and maintained the bare necessities of studying the language, this meant only about half an hour of studying each day. That’s not too bad, huh?
Anyway. As stated earlier, actively studying will be unavoidable as a student. It is entirely possible that the method Anki and it’s spaced repetition provide don’t actually work for you, but just don’t lie to yourself either.13 Find another way that does work for you. There are plenty of studying methods that could be suitable (including some interesting new ones14 gaining popularity), but more likely than not, reading through your textbook a few times and cramming a summary the night ahead of an exam won’t be one of them.
- “But wait Stevie hold up, if I get this right, I’ll be forced to use Anki, like, forever? Won’t I ever be able to just quit and bask in my new-found fluency?“
This one’s a bit difficult. I’ve heard of people using Anki for over 8 years, applying it solely as a language maintenance tool and only very occasionally adding new vocab cards when appropriate. This rings more true to me. Spaced learning means they’re only getting like 5 - 10 minutes worth of repeating old cards by now anyway so why not? If there’s ever a time, however, when you’re comfortable enough to process media as-is, and you feel you’ve been a slave to Anki for far too long, don’t let me stop you; uninstall Anki and bask in your newfound freedom! Just… don’t let all that progress go to waste! Maintain your language skills!
Wait! There is more!
The main goal of this post was to introduce Anki both in it’s core usage as well as the wide range of appliances in the field of both linguistic and academic studies. If you’ve any further questions, feel free to leave a comment below.
That being said, Anki is customizable to the point books have been written on the topic. Trying to contain everything in a single post (“A quick guide to Anki”) is an impossible mission. There are several other features I feel are useful (and underrepresented) enough in mainstream language blogs to warrant further writing though (namely Anki’s API, statistics, useful plug-ins, and integrating Rikaisama and J-pod101’s audio). Check these out in my next blogs:
- Setting up a perfect vocab-mining environment with Anki and Rikaisama
- Using Anki’s API to contextualize your vocab cards with example sentences
- Making the switch: J-J definitions in your vocab cards
Further reading
- Anki Manual: the official Anki manual. If you’re into that kind of thing, theirs is excellent and very comprehensive. I recommend saving these for after you’ve gotten used to the software a bit.
- Japaneselevelup.com: one of the most popular Japanese self-learner resources out there, themed after a roleplaying videogame (a bit gimmicky but there’s a large audience for that stuff). Probably mentions Anki more as I do (my god).
- Twenty rules of formulating knowledge: an article on making quality flashcards by Dr Piotr Wozniak, the author of the very first SRS algorithm as used in Anki predecessor SuperMemo.
- Anki Essentials: a 100+ page guide on using Anki. Told you there were books written on Anki. I’m not much of a fan on the downloadable self-help e-book hype but for what I’ve read, this one’s surprisingly good.
-
Image taken from the 2012 Japanese animated film Wolf Children by Mamoru Hosoda, used under Fair Use doctrine. ↩
-
Flashcard sets consisting of respectively 2000, 6000 or 1000 words with example sentences, all accompanied with high quality audio. They’re available both as Ankisets or on Anki alternative Memrise. As I’ve started learning Japanese through university I can’t attest for it’s helpfulness yet, but the addition of spoken sentences for context is a major advantage indeed. ↩
-
This is for more technical users and there really is no reason not to use AnkiWeb’s servers, unless they’re permanently down for some reason. Read more on https://github.com/dsnopek/anki-sync-server. ↩
-
Except if you’re on iPhone, but if you’re able to afford Apple products that shouldn’t be much of a problem. Aside from donations that’s the only income the developers get anyway, and it’s license is peanuts compared to buying any triple-A video game on current-gen consoles. ↩
-
Karpicke, Jeffrey D., en Henry L. Roediger. 2008. “The Critical Importance of Retrieval for Learning”. Science 319 (5865): 966–68. ↩
-
OCR: Optical Character Recognition: basically recognizing text or characters through an image (like a scan or photograph taken with your cellphone). I recently found this free manga reader for Android with OCR and dictionary which looks pretty cool. Check it out at http://ocrmangareaderforandroid.sourceforge.net/ ↩
-
A Japanese reading aid by printing the word’s pronunciation in syllabic characters above the original word. A more general term for this is ruby, and such annotations are commonly used for the romanization of other languages as well. Read more: https://en.wikipedia.org/wiki/Ruby_character ↩
-
Comma-Seperated Value files: plain text containing data formatted as table by separating them through commas. ↩
-
The danger in this is learning information loose from it’s context. Be sure to structure your ankiset accordingly as well to remain aware of the big picture. ↩
-
to ankify: “to process large sets of information into small, managable flashcards prepared for the memorization tool Anki”. At least, that’s how I’d expect to see this term if it were to actually exist. ↩
-
A popular formula of questions, whose answers are considered as base intel, in any type of problem-solving, research or journalism. Read more at https://en.wikipedia.org/wiki/Five_Ws ↩
-
SRS or Spaced Repetition System is how the Anki/learning community commonly referred to spatial learning. ↩
-
Actually there are several notables arguing against Spaced Repetition, but honestly, the real value in these articles lies in the counter-arguments provided in the comments. Example: https://www.scotthyoung.com/blog/2012/08/05/forgetting-is-good/ ↩
-
Memory Palaces (also known as Method of Loci) are gaining some new popularity thanks to TV series Sherlock, and rely on spatial memory. Venn Diagrams and other kinds of graphical tools also target our visual memory, and are quite helpful, but these could surely be combined with SRS (in fact, I believe visual stimuli are fundamental to your sets anyway). ↩